Creating 3D box for applications, products...
Tuesday, 21 October 2008
In this tutorial, i will show you how to make 3D box for an application (or any product), by using Photoshop. The technique is very simple, and the result can be astonishing, and very creative. Before we start making this box, it would be usefull to make a picture that presents sides of our box.
Step 1:
Remember that while you create pages of your box (their apperance), do them separatly, and, in the end, put them side by side, as shown on picture.

Step 2:
Now we will bend the sides, so we get 3D effect. First, take care to group or merge all layers of one page of the box. It's important to do with one object. When you have selected front side of this 3D box, choose "Move tool", and make "Show Transform Controls" on, as shown on picture.

In the end, you should get the front side that is marked like this:
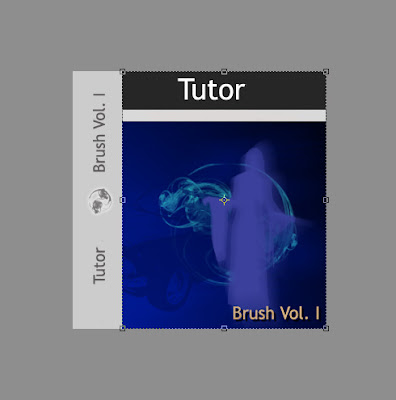
Now the improtant part comes. While you hold Ctrl+Alt+Shift, with your mouse click on the upper right corner, and slowly draw downwards. By holding these commands, you'll make both pages (upper right, and lower right) move simultainosly. Experiment while you don't get the right angle...
The result should be as follows:
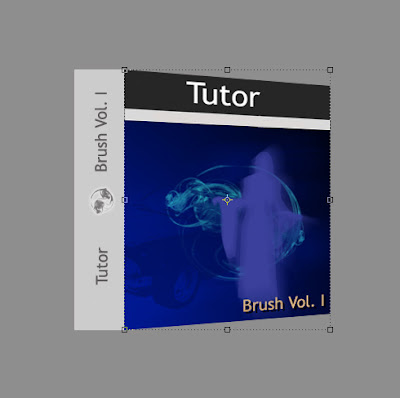
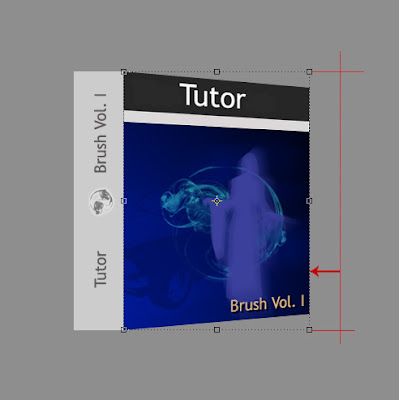
When we have done this effect, we eill notice that this front page is little more streched than we want it to be (it spoils 3D effect). We will narrow it by doing this:
Choose option Transform -> Scale , and while holding middle right pad (square that allows you to click on it and draw left-right) draw it little to the middle. Effect that we want to achieve is this:
Step 3:
When we have finished this, we can freely say that we have finished with the front side. Repeat the same technique on the side also. How to move it, and on what angle..it all depends on your imagination.. If you can not see in advance how it should look, take standard box, and look on what angle the edges are..
End look is like this:

The box is over!
What we are left to do is polishing, to make it look more cool.
Step 4:
We will do several steps to make this box shiny. First we will do is make a stand. The stand is going to be gradient that you can see on the following picture:

We do this in a following way...
First, choose two colors in toolbox, one gray (the background color), and the other is a bit lighter compared to first color. When you have set that, create new layer on top of the project. Then choose "Gradient tool" from toolbox. After that, create one gradietn object on the new layer. Draw from horisontal middle towards the edges to get one gradient circle. Then, cimply select upper half (from vertical half of the circle upwards) and delete that part.
In the end, all you need to do is to set created layer so it stands between background and box.
All that should approximate the picture showen above.
Step 5:
In the following steps we will show you how to make shining on our 3D box. For the start it would be usefull to make duplicate of two sides of your box. When you have made duplicates, selct them and do:
Edit -> Transform -> Flip Vertical
After that, move those parts below our 3D box, so that edges of our 3D box, and it's reflection touch as on the picture below.

Now, by using Edit > Transofrm > Skew we will set that each side of this reflection is completly in touch with the edges of 3D box. So, select one side, choose this option, and move those edges that do not touch the edges of the 3D box. When you do that on both sides, reduce their opacity to 50%...
And the result should be....

On this picture, you also see that lower part of the reflection dissapears.. I did that by using opacity Layer mask.
That is it.
Experiment a bit with different perspectives of the box, so as to see what else you can get.
Step 1:
Remember that while you create pages of your box (their apperance), do them separatly, and, in the end, put them side by side, as shown on picture.

Step 2:
Now we will bend the sides, so we get 3D effect. First, take care to group or merge all layers of one page of the box. It's important to do with one object. When you have selected front side of this 3D box, choose "Move tool", and make "Show Transform Controls" on, as shown on picture.

In the end, you should get the front side that is marked like this:

Now the improtant part comes. While you hold Ctrl+Alt+Shift, with your mouse click on the upper right corner, and slowly draw downwards. By holding these commands, you'll make both pages (upper right, and lower right) move simultainosly. Experiment while you don't get the right angle...
The result should be as follows:

When we have done this effect, we eill notice that this front page is little more streched than we want it to be (it spoils 3D effect). We will narrow it by doing this:
Choose option Transform -> Scale , and while holding middle right pad (square that allows you to click on it and draw left-right) draw it little to the middle. Effect that we want to achieve is this:

Step 3:
When we have finished this, we can freely say that we have finished with the front side. Repeat the same technique on the side also. How to move it, and on what angle..it all depends on your imagination.. If you can not see in advance how it should look, take standard box, and look on what angle the edges are..
End look is like this:

The box is over!
What we are left to do is polishing, to make it look more cool.
Step 4:
We will do several steps to make this box shiny. First we will do is make a stand. The stand is going to be gradient that you can see on the following picture:

We do this in a following way...
First, choose two colors in toolbox, one gray (the background color), and the other is a bit lighter compared to first color. When you have set that, create new layer on top of the project. Then choose "Gradient tool" from toolbox. After that, create one gradietn object on the new layer. Draw from horisontal middle towards the edges to get one gradient circle. Then, cimply select upper half (from vertical half of the circle upwards) and delete that part.
In the end, all you need to do is to set created layer so it stands between background and box.
All that should approximate the picture showen above.
Step 5:
In the following steps we will show you how to make shining on our 3D box. For the start it would be usefull to make duplicate of two sides of your box. When you have made duplicates, selct them and do:
Edit -> Transform -> Flip Vertical
After that, move those parts below our 3D box, so that edges of our 3D box, and it's reflection touch as on the picture below.

Now, by using Edit > Transofrm > Skew we will set that each side of this reflection is completly in touch with the edges of 3D box. So, select one side, choose this option, and move those edges that do not touch the edges of the 3D box. When you do that on both sides, reduce their opacity to 50%...
And the result should be....

On this picture, you also see that lower part of the reflection dissapears.. I did that by using opacity Layer mask.
That is it.
Experiment a bit with different perspectives of the box, so as to see what else you can get.
0 comments:
Post a Comment